QuickBooks users have the leverage to import their customer list in QuickBooks Pro. The procedure for the same is pretty simple and requires users to adhere to a few simple steps. Notably, QuickBooks users cannot proceed with the invoicing unless they have the customer contacts added to their invoice. In this context, users can add contacts individually. However, if the user has an existing file that carries full contact information of customers, the importing process will be easier. This article shall guide you towards importing your customer list into QuickBooks Pro. So, stick around till the end.
Procedure to Import your Customer List in QuickBooks Pro
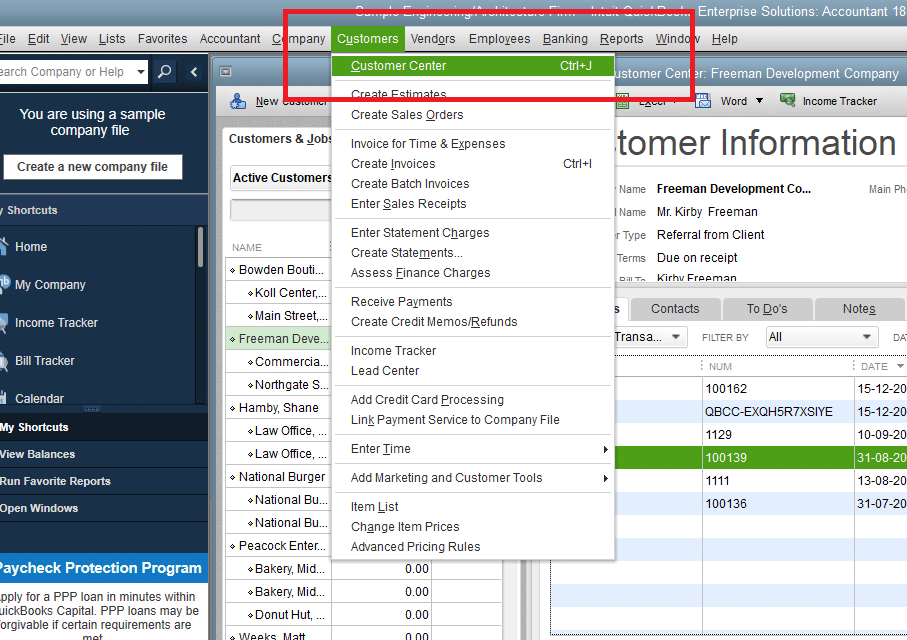
- To initiate the process of import your customer list, start off by heading to the Customers option.
- After that, head to the Customer Center.

- From there, choose Excel and click on the option to Import from Excel.
Step 1: Choose the Customers
- Users should be able to see a prompt on the screen stating “if you are importing the Customers, Vendors, or Products I sell.
- Herein, pick the Customers option.
- In case, user’s Excel file has already been formatted like the Customer Import template of QuickBooks Pro, he/she should skip the step and instead click on the Advanced Import option. The option should be accessible on the right side of the screen. Click on it to finish the importing of customers.
- In case, the user is importing the customer list for the first time, he/she will see a popup box message stating that the imported information cannot be undone.
- Herein, hit on Yes in order to continue with the process of importing the customer list.
Step 2: Copy paste the Customer data
- The next step requires users to copy the customer list data from the existing Excel file.
- Subsequently, users are required to paste the customer list data into the QuickBooks Excel template file.
- Once the user hovers over any specific cell, QuickBooks Pro will give the details about the type of information that needs to be incorporated in that particular cell.
- Users should be able to find the example of the process to format cells located above the column headings.
The below –mentioned customer information can be saved:

- Company Name
- Mr./Mrs.
- First Name
- Last Name
- M.I.
- Display As
- Street 1
- Street 2
- City
- State
- Zip
- Phone
- Fax
- Alternative Phone
- Account Number
Step 3: Rectify any issues
- Before finalizing the process of importing your customer list on QuickBooks Pro, it is pertinent to ensure that the file is devoid of any errors.
- In case of any major issue, QuickBooks Pro will show up a warning message in the error box located on the top left side of the file.
- Also, a red warning triangle will show up in the cell that is facing the issue.
- QuickBooks Pro will guide you through the process of easy rectification of the error.
Step 4: Choose Add My Data Now option
Upon ensuring that all the data pertaining to the customer list is correct and devoid of any issues, users need to hit on the Add My Data Now option.
Step 5: Saving the Changes
This step requires the users to save the changes made to the QuickBooks Excel template.
- For that, hit on the option to Save and Add My Data Now.
- Make sure not to pick the option “I will add my data later”. By choosing this option, users will lose their data and all the changes made to the Template file.
- Choose the location to save the file and then save the file on the system.
Step 6: Opt for the File
- Upon saving the file, the file shall automatically appear in the box.
- If it doesn’t show up, just click on Browse, and then choose the file.
Step 7: Importing the Customer List File
- Pick the option labeled Add My Data Now in blue color.
- This action will successfully import the customer file list.
- Users can view the customer list any time upon importing the list.
- For viewing the customer list file, users can visit the Customer Center option.
- That culminates the importing process of the customer list in QuickBooks Pro.
Once you have completed these steps, QuickBooks Pro should have imported your customer list successfully. You can double-check that the customers have been imported by going back to the “Customer Center” and verifying that the new customers are listed.
Winding up!
Our experts hope that the step-by-step procedure enumerated in this blog should help you in Importing your customer list in QuickBooks Pro. If you feel need of technical support, you can reach out to our QuickBooks desktop support experts without any hesitation by calling at the 24/7 helpline number i.e., 1-888-368-8874.
More similar topics:


