SDI is an abbreviation for State Disability Insurance, which is a tax paid by the employee. It is paid by employees and assists them in case of an accident while working. The SDI rates vary across different states. Notably, only a few states offer State Disability Insurance contributions. If you are seeking the procedure on how to change SDI rate in the different QuickBooks products rolled out by Intuit, this article will be of immense assistance to you.

More about State Disability Insurance
State Disability Insurance (SDI) rates vary according to the state of residence. The states in which SDI contributions exist include New York, Rhode Island, California, Hawaii, and New Jersey. It is pertinent to note that SDI rates do not get adjusted automatically, but rather, need to be manually adjusted.
Few things to consider prior to changing SDI rates in QuickBooks
Before changing the SDI (State Disability Insurance) rates in QuickBooks, there are a few things that you should consider:
Check the current SDI rate:
Before you change the SDI rate, you should check the current rate in QuickBooks. This will help you determine whether the rate needs to be changed or not.
Verify the new SDI rate:
Make sure that you have the correct SDI rate for your state. Each state has its own SDI rate, so you need to ensure that you have the correct rate for your state.
Determine the effective date:
Decide on the effective date for the new SDI rate. You should make sure that you enter the correct effective date in QuickBooks, as this will impact your payroll calculations.
Check the impact on payroll:
Changing the SDI rate will affect your payroll calculations. You should review your payroll calculations and ensure that they are accurate before and after the change.
Update all the QuickBooks Components:
To update all the QuickBooks components, follow these steps:
- Open QuickBooks and log in to your company file as an administrator.
- Go to the Help menu and select Update QuickBooks Desktop.

- In the Update QuickBooks Desktop window, click on the Update Now tab.
- Put a checkmark on all the components that you want to update.
- Click on the Get Updates button to start the update process.

- Wait for the update process to finish. This may take several minutes, depending on the number of components that need to be updated.
- Once the update process is complete, click on the Close button to close the window.
- Restart QuickBooks to ensure that all the updates have been applied.
Update employee records:
After changing the SDI rate in QuickBooks, you should update the employee records to reflect the new rate. This will ensure that the correct deductions are made from each employee’s paycheck.
Check the impact on tax filings:
Finally, you should review the impact of the new SDI rate on your tax filings. You may need to make adjustments to your tax filings, so you should be prepared for this.
Update QuickBooks Desktop:
To update QuickBooks Desktop, follow these steps:
- Open QuickBooks and log in to your company file as an administrator.
- After that go to the Help menu and select Update QuickBooks Desktop.

- In the Update QuickBooks Desktop window, click on the Update Now tab.

- Make sure that the “Reset Update” checkbox is selected. This will clear the previous update downloads and start a new download.

- Put a checkmark on all the updates that you want to install.
- Click on the Get Updates button to start the download process.
- Wait for the download to finish. This may take several minutes, depending on the size of the updates.
- Once the download is complete, click on the Install Now button to start the installation process.

By considering these factors, you can ensure that the process of changing the SDI rates in QuickBooks is smooth and error-free.
Simple Walkthrough to Change SDI Rate in Different QuickBooks Versions
To change the SDI (State Disability Insurance) rate in QuickBooks, follow these steps:
Important: The steps to change the SDI rate may vary depending on the version of QuickBooks you are using. Make sure to verify the steps specific to your version of QuickBooks.
Steps for Adjusting the SDI Rate in QuickBooks Desktop Payroll
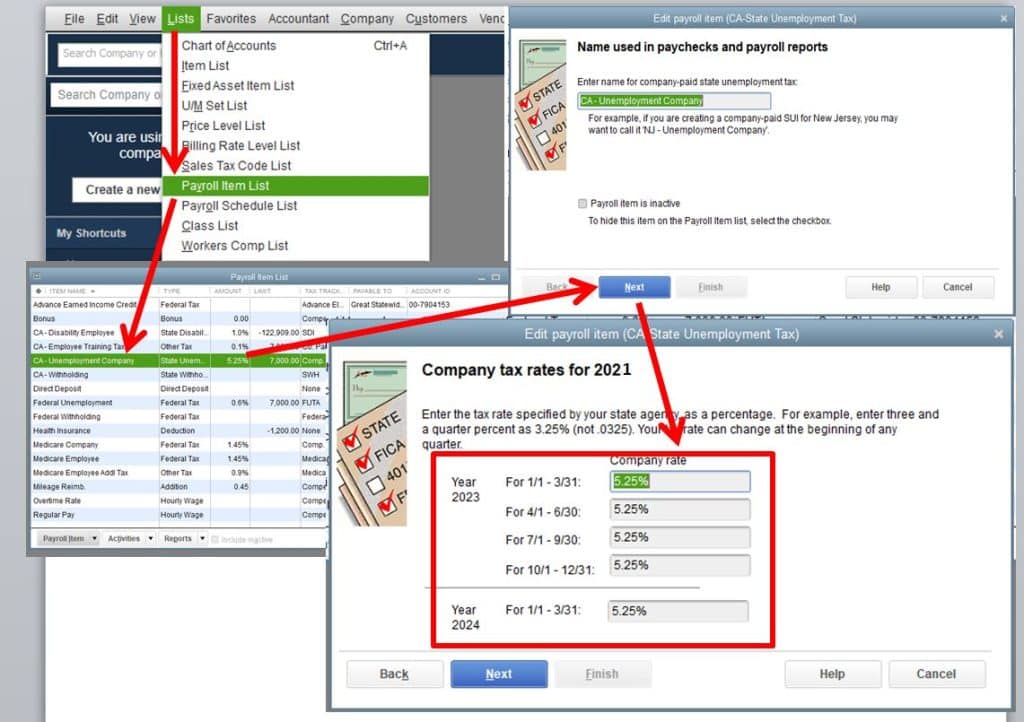
- Open QuickBooks Desktop Payroll.
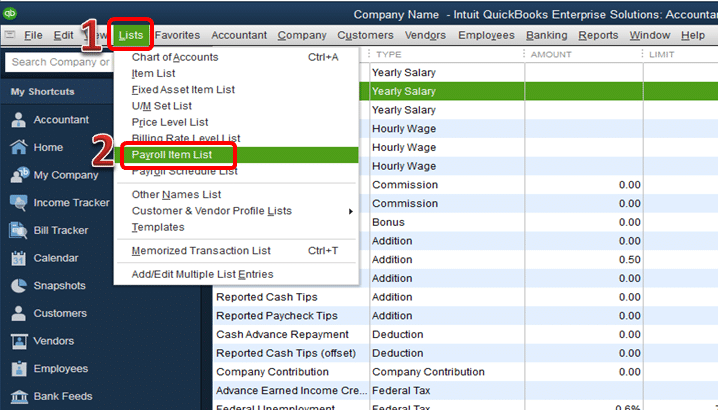
- Subsequent to that, click on the List tab.
- Now, pick the Payroll Item List tab.

- Right-click the Company tab and click on Next.
- Head to the Company Tax Rate window.
- Therein, provide the correct SDI rates in the space provided.
- After that, click on Next tab.
- Finally, click on Finish to change SDI rate in QuickBooks Desktop Payroll.
Procedure to Alter the SDI Rate in QuickBooks Online Payroll
- To begin the procedure, navigate to QuickBooks Online Payroll.
- Sign in to the account after providing the correct login credentials.
- Upon opening the account, head to the Payroll settings.
- Choose the State and subsequently click on Modify.
- After that, hit on the State Disability Insurance tab.
- Click on the Modify or Add option.
- Enter the revised SDI rate and any updated information.
- The tax rates can be changed by adjusting the Surcharge or Assessment tax rates.
- Upon making the required changes, click on Ok.
Steps to Change the SDI Rate in QuickBooks Payroll Enhanced
- The first step is to sign in to the QuickBooks Payroll account.
- After that, click on the Setup option.
- Following that, head to the State Taxes option.
- Herein, click on the State Disability Insurance tab.
- Choose the option to Add or Change.
- Subsequently, type in the new SDI rate and also incorporate the effective date.
- Click on Ok to save the changes.
Summing Up
This article briefed users with the easy procedure to change SDI rate in the different versions of QuickBooks. If users come across further issues pertaining to SDI adjustment or any other QuickBooks issue, they may call our QuickBooks desktop support advisors by ringing a call at 1-888-368-8874.
Other helpful topics


