QuickBooks is an avant-garde software that has transformed the landscape of accounting, offering solutions that benefit not only large corporations but also small and medium-sized enterprises. This powerful application streamlines financial operations, making complex tasks more manageable.
While QuickBooks consistently delivers positive changes to business operations, it is, like all software, susceptible to occasional issues. Users may encounter various errors, some of which are easily resolvable with simple troubleshooting. However, certain complex issues may necessitate the intervention of an expert. This platform aims to guide you through common QuickBooks challenges, helping you maximize your efficiency and minimize downtime.
What is the QuickBooks error code 6000, 82?
The QuickBooks Error 6000 82 is a very common technical snag faced by QB users. Generally this error happens when the users try to open the company file or when the QuickBooks individuals make an attempt to access the company file data stats that the application cannot reach as they are located in an additional computer. It mostly happens when there are multiple clients. You may see the following error message on your desktop screen:
In this blog post, we are going to discuss QuickBooks error code 6000, 82, and why this error occurs. You can fix this error with the help of our enterprise support experts or go through the below-given manual solution methods.
Easy Avenues of Troubleshooting the QuickBooks Error Code 6000 82
Avenue 1: Remove the blank spaces before the company file
The next incentive step to follow is to get logged out from the QuickBooks Desktop on all the computers.
Once done with that, you just need to access the folder housing the company file.
Next, you are required to click right on the company file.
After that, you are supposed to choose the Rename tab.
Now, hit on the name of the file, and find and remove if there are any spaces between the file extension and the company name.
In the next step, attempt to open or create a company file.
Avenue 2: Turn off hosting on each computer
Step 1: Access by Single-User
Turning off the hosting mode disables multi-user access. Proceed ahead by following the following set of instructions.
At the very first step, proceed to File.
Then you have to opt for Utilities.
Then choose the Stop Hosting Multi-User Access option.
After you get the message, “Stop hosting multi-user access,” hit on the “Yes” tab.
Opt for Yes, after you get the message, the company file must be closed.
Step 2: Access by Multi-User
This error may also cross your path when more than one client computer is set up incorrectly to host the multi-user access.
If on every client computer the error is displayed, then follow the steps below:
Choose File, then opt for Utilities in the No Company Open window.
After this, you have to confirm that the menu option Host Multi-user Access is showing. In multiple client computers, the following message may display: ‘Stop Hosting Multi-user Access.’ It indicates that these computer systems are already hosting the multi-user access.
On any client computer that is showing the ‘Stop Hosting Multi-User Access‘ message, choose it and then follow the steps for turning off the hosting.
After this, open the problem file again, and now the log-in window will be displayed.
And if the problem persists, try out the next method.
Avenue 3: For Multi-user access, switch to Hosting Local and Remote files mode
Follow the below-mentioned process if the previous steps don’t assist in resolving the error.
When QuickBooks is opened, tap on the F2 key to open the Product Information page.
At the bottom of the window, verify the Local Server Information if hosting is set to local files only.
Now, opt for the File Menu and then choose the Switch to Multi-User Mode option.
After this, you have to open the company file on the network computer. If you require more help, then check out the QuickBooks in-product or set up multi-user or network for QuickBooks Desktop resource page.
After the company file is open, click on the ‘F2 key‘ so as to open the ‘Product Information‘ window.
Now you have to verify the ‘Local Server Information,‘ which is at the bottom of the window. Hosting is set to local files only.
Avenue 4: Restart the Client computer
Restarting the system is one of the effective ways of solving the problem. However, it will revert the device back to scratch and will delete the current state of the software. If this doesn’t work, then try out the next step.
Avenue 5: Accompany standard data troubleshooting
There can be a possibility that the company file has data damage. To resolve that, check the Resolve data damage issue, which is basic troubleshooting.
You need to first hit on the Utilities tab from the File menu and then hit on Verify data.
Furthermore, when the error message appears stating QuickBooks detected no problem with the data, pick the OK tab.
Continue using the Company file.
Just in case the verify data tool finds an issue with the data, you will be prompted to Rebuild now.
Hit on Close. Or perform the following steps:
Look for the QBWin.log or QuickBooks.log files.
From the Tech Help window, if you are working with a support agent, then hit the Send log files to Intuit support.
This will send the file to the repository that will enable the support agent to view the log files.
Just in case you are working with a support agent, then locate the most recent file for verification.
In case you are a Mac user, then scroll all the way to the bottom for the most recent verification information.
Look for the line that has LVL_ERROR.
You might see the Data Damage Top LVL Errors Library.
Avenue 6: Running quick fix program on the client PC
Moreover, choose the Quick Fix My Program tab from the list.
End the process by starting the QuickBooks desktop and then opening the data file.
Avenue 7: Use Verify and Rebuild Tool
Heading forward, you need to click on the Utilities tab from the file menu.
Next, then click on the Verify data.
While the error message pops up on the screen stating, “QuickBooks detected no problem with the data“, you are required to click on the OK tab.
After that, you need to continue using the company file.
If, in any case, the Verify tool finds an issue with the data, you must rebuild now or view errors.
Next you will have to click on Close.
Or you should perform the following steps:
Spot the QBWin.log or QuickBooks.log files. From the tech help window, in case you are working with a support agent, then you need to click on the Send log files to Intuit support.
After that, the file will be sent to the repository, which will enable the support agent to view the log files.
If, in case you are working with a support agent, then you will need to locate the most recent file for Begin Verify.
Or if you are a Mac user, you are supposed to scroll to the bottom for the most recent verified information.
Search the line that contains the LVL_ERROR.
Once done with that, you now have to look for QuickBooks Learn and Support.
Later on, you can also see the data damage in the Top LVL errors library.
Signs and symptoms that lead to the QuickBooks error code 6000 82
You can simply identify the QuickBooks error code 6000 82 using the below-given signs and symptoms:
One of the basic signs can be if the system or the software freezes repeatedly
Another common sign can be if the system crashes again and again with the same error message.
If the Windows is running slowly.
If the error code itself appears on the screen.
Triggers to QuickBooks Error code 6000 82
Below are the reasons that incite this Error 6000 82 in the QuickBooks desktop software.
Damage caused in the data source name.
Damage to the QuickBooks Transaction Log file.
The Network Descriptor (.ND) file got damaged.
Still in need of assistance?
By following the above-mentioned steps, you can fix QuickBooks error 6000 82. However, for further help, you can connect with our enterprise support, available 24/7.
You will get a quick solution to all the QB-related issues by getting in contact with our well-trained experts. You can just connect with our 24/7 QuickBooks Enterprise error support team of experts, who will be there to assist you in a single call.
Here are the most common reasons and solutions for QuickBooks Error H505:
QuickBooks has become an indispensable tool for small and mid-sized businesses globally, thanks to its user-friendly interface and robust multitasking capabilities. A key advantage for many organizations is its ability to support simultaneous access for multiple users (depending on your QuickBooks version), even from remote locations.
However, like all sophisticated software, QuickBooks occasionally encounters errors that can disrupt your workflow. While many minor issues can be resolved with in-app prompts, some require specific troubleshooting. Today, we’re focusing on a common and particularly disruptive issue: QuickBooks Error Code H505. This error specifically relates to multi-user access and can prevent your team from working collaboratively.
This guide will delve into the causes of QuickBooks Error H505 and provide clear, actionable solutions to get your multi-user environment back on track.
Solutions to Troubleshoot the QuickBooks Multi-User Error H505
We are now into the section containing viable solutions for resolving the QuickBooks error H505. Try these solution steps in order to resolve this problem
Solution 1st – Modify your System’s Firewall Settings
Initially, hit on the Windows key on the keyboard and proceed to Control Panel.
Within the Control Panel, head to the Firewall Settings.
After that, choose the Allow a Program through your system’s Firewall.
Moving ahead, you need to hit on Add Program tab and include QuickBooks 20xx to the exception list.
Restart your computer to save the changes.
Add the following ports according to the version of your QuickBooks software:
QuickBooks Desktop 2015: 8019, 56725, 55363-55367
QuickBooks Desktop 2016: 8019, 56726, 55368-55372
QuickBooks Desktop 2017: 8019, 56727, 55373-55377
QuickBooks Desktop 2018: 8019, 56728, 55378-55382
QuickBooks Desktop 2019: 8091, XXXXX, XXXXX-XXXXX
QuickBooks Desktop 2020: 8091, XXXXX, XXXXX-XXXXX
QuickBooks Desktop 2021: 8091, XXXXX, XXXXX-XXXXX
QuickBooks Desktop 2022: 8091, XXXXX, XXXXX-XXXXX
QuickBooks Desktop 2023: 8091, XXXXX, XXXXX-XXXXX
QuickBooks Desktop 2024: 8091, XXXXX, XXXXX-XXXXX
Solution 2nd – Assess QuickBooks Hosting Settings
In the very start, you need to launch QuickBooks on both the systems configured as multi-user.
After that navigate to the File menu and select the Utilities option.
In the next step choose Discontinue or Stop Hosting Multi-User Access Configuration.
Now turn on Hosting through clicking on File menu and then hit on the Utilities option and selecting the Host Multi-User Configuration option.
Lastly, you need to restart QuickBooks software on both the QuickBooks.
Solution 3rd – Make Changes to the Setting of Your QuickBooks Folder Location
Initially, you need to make a New Folder on the hosting system.
After that share the folder and set/change Windows access permissions to share company files (contact an IT professional if you are not able to access the QB file server).
Now copy the .qbw file and paste it to the new folder.
Proceed with the scan. This tool will take up to 20 mins time to scan and detect the problem.
Solution 5th – Configure the Firewall Ports Settings
Make sure that the firewall settings are not blocking QuickBooks. You may have to add QuickBooks as an exception or open ports needed by QuickBooks. Usually, these ports are needed to develop a proper network connection. Also disable the firewall and then try to switch to the multi-user mode to host the company file.
At first, you need to open Run box by clicking on the Windows + R keys together.
After that type in ‘Control Panel’ and hit on the Enter key.
Moving ahead, you need to select the System and security option.
Following that, open the Windows firewall and network protection.
Now you have to hit a click on the Advanced settings tab and also choose Inbound rule.
Next step is to choose New rule option and then opt for a Port and hit on the Next tab.
Now select the correct TCP option.
Hereafter, you need to enter the port of the QuickBooks year version.
After the year code has been entered in the respective field, hit a click on the Next tab and restart your PC once.
Solution 6th – Edit the Host File
Step 1: Finding the IP address and system name of the server and workstation:
At first, you need to hit a click on Windows + R keys on your keyboard. It will pop up the Run box on your screen.
After that type in ‘Cmd‘ and then press Enter key.
In the next step, you need to open the Command prompt window.
Furthermore, enter the ‘Ipconfig/all’ command and press the Enter tab.
Now you need to find the hostname in the Windows IP configuration section.
Then provide the hostname and IP address.
Hereafter you need to repeat the all above given steps into all of the systems with the multi-user setup.
Now you have to move back to the workstation to test the server. Do the following steps here:
Move to the Windows start menu.
Then type ‘Run‘ into the search bar in order to open the Run box.
Now type in ‘CMD’ into the run window and hit the Enter key.
Here you need to type ‘Ping’ command and then hit on the Enter tab.
Step 2: Edit the Windows Hosts File
At first, you need to close the QuickBooks software and move to the Start menu.
After that move to the PC option and head to the address:
C:\Windows\System32\Drivers\Etc
C:\Windows\System64\Drivers\Etc
If you’re not able to find the Windows folder, then perform the steps to unhide the folders.
At first, you need to tap on View and then choose Hidden items.
Now, right-click on the View tab. It will unhide all the hidden files and folder.
In the next step hit a click on open with notepad option.
Now fill in the IP address and system name.
To complete the process, you need to save the changes and then reopen the QuickBooks software in multi-user mode.
Solution 7th – Run the QuickBooks Database Server Manager on Your Server
Step 1: Download and Install the QuickBooks Tools Hub on your Server
Firstly, you need to close QuickBooks desktop and other apps running on the background.
Next, you need to download the latest version of QuickBooks Tool Hub program and save the file on your computer.
Moving ahead, search for the downloaded file (i.e. QuickBooksToolHub.exe)
To run ToolHub.exe file and install the tool hub on your system, you need to follow the on-screen instructions and Agree to the terms and conditions of it.
Now hit double click on the created QB tool hub icon to open it.
Step 2: Run the QuickBooks Database Server Manager on your server
At the very first step, you need to open the tools hub program and then choose Network Issues tab.
It will open the QuickBooks database server manager on your system.
Now inside the Database Server Manager, you need to click on Browse button and navigate to the location of your company file and then select Start Scan button.
You need to select the Start Scan option if you already see your company file folder on the scan folder option.
The QBDSM will automatically repair your firewall permissions.
Once the process finishes, you need to hit on Close.
Lastly, select the File option and Switch to Multi-user Mode.
In case your workstations can go into multi-user mode without any issues, everything is fixed.
A brief about QuickBooks Error H505 and reasons for it’s occurrence
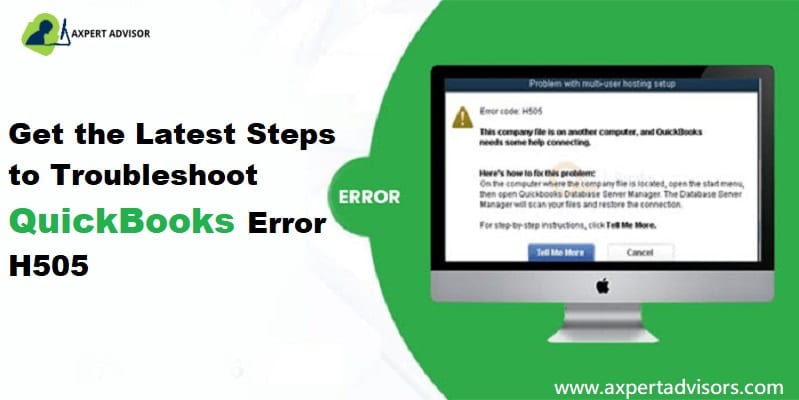
QuickBooks is a prevalent accounting software preferred by evolving businesses. It helps in management of finances efficiently. But even this software can throw up errors and issues from time to time. One such standard error is H505. It can occur if the company file is not located on the computer. This article explains the causes, symptoms, methods to rectify this QuickBooks multi-user error H505. You may get the following image if the multi-user error occurs on your software:
Error
Description
Problem with multi-user hosting setup
QuickBooks has faced a problem and needs to close. Sorry for any inconvenience caused.
Error code H505: This company file is on another computer, and QuickBooks needs help connecting.
Error H505 in QuickBooks enterprise is a part of the H series error in QuickBooks. All these H series errors are hosting settings-based problems. This error usually appears with a message stating that the computer on which the QuickBooks company file is stored needs reconfiguration.
Possible Reasons Behind the QuickBooks Error Code H505
Some of the possible causes of this error code are as follows:
The QuickBooks file you are trying to access is located on some other computer.
QuickBooks installed and available in the system server name is set-up to consent to all the shared connections to the company file, however, the QuickBooks accounting software is failing to communicate resulting in error H202.
Host PC has incorrect settings
Firewall causing connectivity problems.
.ND Network file may be damaged.
The required hosting configuration setting is not appropriate.
QuickBooks database server manager facing issues.
What are the Symptoms of QuickBooks Error Code H505?
This error can be identified easily if the multi-user mode is not accessible.
If in case you fail to access the QuickBooks company file stored on the server.
Another indication of the same can be when the error H505 flashes on the screen.
If the system or laptop crashes frequently.
Windows might become unresponsive and freeze periodically or the software freezes.
Summing Up!
The above-mentioned solutions shall enable you to fix QuickBooks multi-user error H505 and resume working. However, on the off chance that the issue persists, you can contact us and speak to our QuickBooks enterprise support experts via our helpline i.e., 1-888-368-8874. We’ll be happy to help you in every possible way. So, what is the wait for? Just ring us on our helpline and get your queries resolved.
Got QuickBooks Error code 80070057? Here is the solution!
QuickBooks is an indispensable tool for millions of business owners globally, simplifying complex tasks like tracking daily transactions, managing expenses, invoicing, and tax filing. Despite its robust capabilities, users occasionally encounter errors that can disrupt workflow and cause significant delays.
One such issue is QuickBooks Error 80070057. This error can be a major roadblock, preventing you from efficiently managing your financial operations. This comprehensive guide will delve into the precise causes of QuickBooks Error 80070057 and provide you with effective, step-by-step solutions to fix it.
By understanding the triggers behind this error and applying our expert troubleshooting methods, you can quickly resolve the issue and restore seamless functionality to your QuickBooks software. Don’t let technical glitches interrupt your business — learn how to tackle Error 80070057 today.
What is QuickBooks Error Code 80070057?
QuickBooks error 80070057 is one of the errors that users face when they are unable to access or open their company files in QuickBooks. This error indicates that the parameters used in your software are incorrect, causing problems in accessing the company file. Also, this error usually indicates that there is a problem with the network connection in your system. This error code generally shows up as “80070057: the parameter is incorrect.” It denotes that you do not have the required permission to read/write and also create/delete the company files from their current folder or location.
Also, this error usually indicates that there is a problem with the network connection in your system. This network connection is the connection that creates the connection between the server and the workstation. Problems in this connection cause problems in opening the company file. Other reasons for the error to emerge include communication interruptions, incompatibility between QuickBooks and company file versions, etc. You may see the following error message on your computer screen:
Another error message you might see:
Error
Description
Message
80070057 the parameter is incorrect or You do not have sufficient permissions
Message
80070057 the parameter is incorrect.
Message
Error Code 80070057: There was an unexpected error reported while trying to run QuickBooks
Message
Error: “80070057: parameter is incorrect” when clicking on a QBB, QBM, QBW, ND, or TLG file from a Google Search Timeline.
In this article, we are providing you with some invaluable tips to get rid of this QuickBooks error code 80070057 issueand help you to start working. However, you can hire an expert in order to save your valuable time and efforts. Let’s start with the solutions behind this error.
Resolve QuickBooks Error 80070057 When Trying to Open Your Company File
Perform the following recommended solutions to resolve the Error code 80070057 in QuickBooks desktop:
Solution 1: Verify the company file name extension
Right-click on the company file.
Then, click on Properties and then QuickBooks.
Now, check the company file extension, if it is not qbw, then change it to qbw.
Then copy and paste the company file into the new folder.
Next, rename the new folder and change the extension of the file to .qbm
To save changes click anywhere on the screen.
Now open QuickBooks Desktop to Restore the Portable.
Rename the extension to .qbb if you are not able to open QuickBooks.
Again Open QuickBooks Desktop and restore the Backup.
Rename the File extension to .qbx if it still doesn’t open.
Lastly, open QuickBooks to convert the file to an Accounting copy.
Copy the company file and paste it into another folder on the Flash Drive
Open the Windows Explorer with QuickBooks Desktop.
Right-click on the File option and select New Folder.
Then Copy (CTRL+C) the “Companyfile.QBW” from the Flash drive and Paste (CTRL + V keys) it into the new folder.
Finally, open QuickBooks Desktop and then new folder.
Solution 2: Perform a Clean Installation of QuickBooks
Perform a clean install while uninstalling and reinstalling QuickBooks. You can also uninstall QuickBooks manually from the Control Panel and then reinstall the software. You will need your license key while re-installing the QuickBooks software.
Open Control Panel then the Programs and Features.
After that find QuickBooks desktop, then go for Uninstall/Change tab.
Now, click on Uninstall and wait till QuickBooks is removed.
Then, rename the QuickBooks folder, and proceed with reinstallation of QuickBooks.
Solution 3: Convert the Files From Mac to Windows (Mac Users Only)
In case you are converting files from Mac to Windows, make use of the Back-Up option available in Windows function and convert QuickBooks from Mac to Microsoft Windows.
Solution 4: Install and Run the QuickBooks File Doctor
And then, select the Network issues, in the tool hub.
Next you need to select the QuickBooks Database Server Manager. In case QuickBooks isn’t installed on the server, you will be prompted to install it.
After that, select the Start scan option inside the database server manager, in case the company file folder is displayed. In case they aren’t displayed, then browse to the location of the company file and then select the start scan option.
The last step is to opt for the close option and you are good to go.
Solution 10: Modify Firewall and Antivirus Settings
Press Window + R key together from keyboard.
Type Control Panel in the search box and hit on enter key.
Go to the Firewall Settings.
Click the “Allow a Program option and select “QuickBooks” to include it in this list.
At last click Ok button and reboot your system.
Causes for the QuickBooks error message 80070057?
There can be the following reasons that may cause error code 8070057:
The company file can’t be read because its extension got changed.
Your system’s firewall or Internet security settings is not configured for QuickBooks desktop.
Sometimes antivirus blocks the ports between computers are also responsible for this error.
You are attempting to open a portable file while the QuickBooks application isn’t open.
Windows file extension type is wrong for the QuickBooks application.
When you are trying to open a file that is stored on a USB flash drive.
You are accessing the QuickBooks company file via the shared folder.
Your company file has some damage that is detected by QuickBooks at the time of installation.
QuickBooks not installed completely.
Due to corruption of the network data (.AND) file, you may face the error. Generally, this happens when you are trying to delete .AND files on the server or host PC.
Noticeable Signs and Symptoms of QuickBooks Error 80070057
You can check out the below signs, so as to successfully identify such errors:
You can also identify such an error if the program Windows crashes repeatedly.
If the system freezes.
Error 80070057 can also be identified if the company file collapsed suddenly.
We arrive at the conclusion.!
We hope that after following the solutions included in this article, you were able to fix the QuickBooks Error Code 80070057. If the issue persists or you need any additional assistance related to QuickBooks, you can call our 24×7 QuickBooks support and speak to our experts at 1-888-368-8874. Feel free to call us anytime as our experts are available 24/7 to help you out on all the QuickBooks related issues.
Here are the reasons and solutions of QuickBooks Error 6000 83:
QuickBooks is an invaluable tool for small and mid-sized businesses, empowering owners and accountants to efficiently manage complex accounting tasks like bookkeeping, invoicing, cash flow management, growth tracking, and tax preparation. It’s designed to save both time and money, making sophisticated financial operations accessible without the need for extensive staff or external services.
However, like any robust software, QuickBooks can encounter technical glitches. One common issue users face is QuickBooks Error Code 6000, 83, a company file error that typically prevents you from accessing your crucial company file or performing essential backup and restore operations.
This guide will dive deep into QuickBooks Error 6000, 83, exploring its causes and providing detailed steps you can take to fix it. Get ready to regain seamless access to your QuickBooks company file and keep your business running smoothly.
What Is QuickBooks Error Code 6000, 83?
QuickBooks error code 6000 83 is one of the 6000 series company file errors that can cause great damage to your company file data. You may get such errors when trying to open, restore or perform backup operations on your company file in QuickBooks. Thus, you may face frequent crashes and application failures. When this error occurs you may see the following error messages on your computer display:
Error
Description
Warning
You do not have sufficient permissions to the specified folder. To use QuickBooks in a multi-user environment, you must have read/write access and create/delete rights to the folder where the company file is stored.
Warning
An error occurred when QuickBooks attempted to access the company file. Please try again. If the problem persists, contact Intuit technical support and provide them with the following error code: (-6000, -83)
Warning
Unable to access company file error: – 6000, -83
Error
We’re sorry, but QuickBooks can’t open your company file.
Solutions to Troubleshoot QuickBooks Error Code 6000 83
There are many solutions to fix the QuickBooks error code 6000, -83. Before taking any steps first we need to know the actual reasons behind the error. When we know the reasons of this error then we should take suitable steps to fix the issue. Here we are giving some solution on the basis of the condition. You can follow to fix them.
Condition 1: Open the QuickBooks company file stored on a Windows Server
The QuickBooks File Doctor tool will scan the company file problems and fix it.
Now, restart the computer.
Solution 2: Turn off hosting on all Workstations that access the file over the Network
In case you use QuickBooks Desktop on multiple systems, configure just one to host the company file. Here are the steps that you can follow to turn off hosting on computers.
Open QuickBooks Desktop and move to File menu.
Here position your cursor over the Utilities tab.
Then select Stop Multi-User Access Hosting option.
If you see the “Host Multi-User Access” option and Stop Hosting Multi-User Access is not listed, do not select “Host Multi-User Access”.
Configure your system Firewall and other security software settings
Important: Intuit does not provide any support service for firewall related issues.
You need to configure the firewall and internet security settings for QuickBooks and also network access to view the exceptions needed.
Perform the instructions from the firewall maker’s website to configure the firewall to allow internet access to QuickBooks files on the entire system.
Verify the permissions to access the QB company file
For confirming that permissions are arranged correctly, you need to see the setup folder & file permissions to share the company files.
In case you want to place permissions, then move to the set Windows access permissions to share the company files.
Furthermore, head to QuickBooks database server manager screen and hit a click on Add folder.
Search the folders that have QuickBooks company files.
After the QuickBooks folders are added, then select Start Scan tab.
Now, under the QuickBooks company files, you need to Check the files.
Lastly, browse to the files and folder that have the company files. Ensure that the qbw and .nd file was created or built for each of the company file.
Check the hosting on the systems
You need to open the QuickBooks application and move to the file and select Utilities tab.
From the list:
If the Host multi-user access option is present, then it indicates that the system is not hosting the company file.
Else, Stop hosting multi-user access should be selected.
Open the company file from a different location
At first, you need to host the system to open the company file.
Move to the system where the company file is saved.
If the only system that stores or installed the server is hosting the system, then you should move the company file to some other location.
Now open the software and also the company file that is facing the issue.
In case you are capable of opening the company file, then check the company file.
Else, move to the other step.
If you are getting instructions from the software to rebuild the company file, then do the same.
Now copy the QuickBooks file to another location.
At first, access the folder having the company file.
After that, right-click on File name and hit on Copy tab.
Now right-click on the Empty area and Paste tab.
Turn on QuickBooks and open the company file on the desktop.
In case the QuickBooks company file opens, then copy the file back to its original location.
Make sure that the original company file name is renamed before copying the file that is freshly opened from the system.
Solution 4: Edit the Windows Hosts File
To complete the following steps, you must have administrator access to the server and any computers connected to the server.
Editing Windows host file
Initially, you need to close QuickBooks on both the server computer and the workstation.
On the server computer open the Windows Start menu and select Computer.
Then move to the following location:
C:\Windows\System32\Drivers\Etc
C:\Windows\System64\Drivers\Etc
Furthermore, you need to double click on Host file.
Now choose Notepad.
In the next step, enter the computer name after the IP address use the Tab key to give a space.
Enter the workstation’s IP and computer name on the server computer.
On the workstation enter the IP and computer name of the server computer.
Click the File menu in Notepad and select Save.
Type “Hosts” (including the quotation marks) as the file name.
Select the Desktop as the location to save the file.
After saving the file right-click on it and select Copy.
Browse to the file location you used in step 2. You can go to C:\Windows\System32\Drivers\Etc or C:\Windows\Syswow64\Drivers\Etc.
Find the hosts file, right-click it, and select Rename.
Rename the hosts file to “hosts old” and select Continue.
In last, press the Ctrl + V keys to paste the copied file, then select Continue.
Get the IP address and computer name of the server and workstation
Press Window and R button key together to open the run box.
Now enter cmd on the run box.
Type ipconfig /all at the command prompt and press Enter key.
Here on the black screen is your server name and IP address note it down.
Repeat these same steps for other workstations.
Condition 2: While Restoring your company file
Solution 1: Check if the file name and the file path are leading to the error
QuickBooks keeps every file name and path at the time we try to restoring the backups. You need to make sure that the file name should not contain any special characters in the file and the path.
Not acceptable: Business\Lina\Lina’s Documents\My Business $.Business – The quotation mark (‘) and the dollar sign ($) are special characters. The Lina’s Documents folder and the My Business $.qbw file should both rename.
Solution 2: Review your Backup file name
Click on Start menu and search file explorer and hit to open it.
Find the folder that contains your backup company file with the .qbb extension.
To rename your company file right-click on the company file name and then select Rename.
Next, restore your company file.
Solution 3: Restore from a Backup
Open QuickBooks and go to the file menu.
Now select Open or restore company and then restore a backup copy.
Click Next and select the Local Backup option.
Browse to the company file backup on your hard drive and click Next.
Follow the prompts to complete the restore process.
Solution 4: Repair QuickBooks desktop
In the first step, you need to go to Control panel and open the Programs and Features option.
After that click on Uninstall a program tab.
Moving ahead, you need to select QuickBooks desktop from the list.
And opt for Uninstall / change.
In next step you need to click on continue > Next > Repair > Next > Finish.
Run QuickBooks. Try to open the company file.
Condition 3: While opening the QuickBooks Company file stored on a Linux server
Important Tip: The below given solutions should be performed by the system administrator with having good knowledge of using the Linux operating system. Additionally, you need to have complete insight of network operations and permission to install properly while configuring the QuickBooks enterprise solution Linux Database Server Manager.
Then, you must configure the database server manager and the directory in the Initord.conf file.
Finally, you must restart QuickBooks enterprise on your host computer.
Solution 2: Configure your host file
You can use the IP address and Linux server name, in order to Edit the host file from the workstation.
Open the start menu on any Network-connected workstation.
Type ‘CMD’ in the search box to open Command Prompt.
Type ‘ping [name of your Linux server]’ and press Enter.
Note the server name and IP address.
Ensure correctness on all workstations, starting with the one displaying error 6000,-83.
Close QuickBooks on all computers connected to the network.
Press Windows + E keys together and open Windows File Explorer.
Navigate to C:\Windows\System32\drivers\etc\hosts.
Right-click on hosts, select Open with and select Notepad.
Finally add the Linux server IP address, press Tab, and add the server name.
Save the file and close Notepad.
Open QuickBooks desktop and access your company file.
Condition 4: When your are creating a backup of the company file in new folder
If QuickBooks Error message 6000, -83occurred while creating a backup of the company file, you can perform the following troubleshooting steps.
Important Tip: Before performing the steps, ensure that if you have stored the company file on a server, then you need to move it to the local hard drive first. Once the error fix done, move back the company file to the server.
At first, go to File menu and select close QuickBooks desktop.
Next, click on Windows Start menu.
Then type File Explorer into the search bar and click to open it.
Select This PC from the navigation bar and open C: drive.
And further, create a new folder and rename it as “QB Test Folder”.
You can scheduled backup as automatically uploaded or you can create it manually every time. (It is recommended schedule automated backups).
Now go to File menu and click on switch to Single user mode.
Again click on File menu and move the cursor to the Backup Company option.
After that click on Create Local Backup and Next.
Simply click on Browse on the Local Backup section and select the location to save the backup for the company file.
Optionally, you can also set the number of backups you want to keep.
You can schedule backup reminders in the online and local backup sections.
Now click on Full verification and let the test backup run. Then confirm with OK.
Next, click on Select it now and schedule future backups and then click on Next. If you don’t want to upload a backup right now, you can alternatively select only schedule future backups.
Select the “Automatically save a backup copy when I close my company file” checkbox and choose the number.
What are the causes behind the QuickBooks error code 6000, 83?
There are several causes which can trigger the QuickBooks error code 6000, 83. Here we discuss some of the common causes after that we discuss the solution to fix this error.
If your company file is damaged it can trigger the error 6000, 83.
There might be missing installation files from the QuickBooks installation directory.
Windows security software prevents QuickBooks from accessing the company file stored on the server.
If your company files have the incorrect file extension like .qbw.adr or .qbm.
The Windows user account has not been granted sufficient permissions to access the server or the QuickBooks database service.
There may be multiple computers in the network hosting company files are also trigger this error.
If you update the company file stored on the server with latest version then it might be the reasons of this error.
Due to network connectivity issues, the client’s workstation cannot connect with the server hosting the company file.
There are Insufficient permissions for your network server, Windows user, or QBDataServiceUserXX
This error could be due to an incompatible version of QuickBooks Desktop.
You are using the wrong path to set up QuickBooks desktop on the client’s computer.
The company file is being hosted by more than one workstation.
Access to the company file is restricted by the server.
Your antivirus is restricting access to QBDataServiceUser.
More than one computer trying to host the company file.
The chances are high that you have set up a different language on Windows other than English.
Users who use a “non-US” or “non-Canadian” version of Windows may also experience this issue on their PC.
On Linux servers:
If there is no qbdir.dat file exists or if qbmonitor function is not monitoring the QuickBooks company file in the directory.
Another trigger can be if the system is unable to ping the server name.
Common Symptoms of QuickBooks error 6000, -83
The error code appears on the screen and the program window crashes.
Windows respond slow to the keyboard inputs.
The system freezes repeatedly.
Conclusion!
In this segment we learnt about the how to fix the QuickBooks error code 6000 83 with the help of the solutions entailed in this article. We also discussed above the major causes of this error and solution to fix it. However, if you have any doubts and you need any technical guidance then you contact our QuickBooks enterprise error support team at 1-888-368-8874. Our experts are available 24 x 7 to provide you with complete support.
Learn what to do if you see QuickBooks Error 3371 (Could not initialize license properties):
Encountering QuickBooks Error Code 3371, often accompanied by Status Code 11118, can be incredibly frustrating. This common technical glitch typically arises when you’re reconfiguring your system or setting up a company file, preventing you from accessing your crucial financial data.
While these errors can be annoying, this comprehensive guide provides the precise fixes you need to tackle them effectively. Scroll through this segment carefully to ensure you don’t miss any vital steps in resolving QuickBooks Error 3371.
If you’d rather not invest your time in manually troubleshooting this issue, our experienced tech experts are readily available to assist you. Simply reach out to our support team for prompt and professional help.
What is QuickBooks Error 3371 (Couldn’t Initialize License Properties)?
This error is a common error reported by many users of QuickBooks software. This error may occur due to a missing or damaged company file. If you are facing this error, then you have reached the right place because in this article we have focused on this error and its causes, alongside a comprehensive section containing all the solutions. When you reconfigure your system or try to activate your QuickBooks desktop for the very first time, then QuickBooks error message 3371 may be on your display screen.
You may get a warning message showing
Error
QuickBooks could not load the license data. This may be caused by missing or damaged files. For troubleshooting steps, note the error and type the following in a web browser window: www.quickbooks.com/support/register.html.
Once you hit the OK button, it will display another box showing as “QuickBooks Fatal Error.“
QuickBooks Fatal Error
QuickBooks has encountered a problem on startup. This may be due to an invalid software license. Insert the QuickBooks CD into your computer and then reinstall the software. If you encounter the problem again, contact Technical Support.
In order to resolve this error without any hassle or exerting any effort, you can take help from our certified experts. Our technical support team will be pleased to help you out with this error code. Check out the infographic below and learn the ways to resolve the ongoing error:
Different Fixes for QuickBooks Error 3371 Status Code 11118
This section encloses some of the easy yet effective methods to resolve the QuickBooks Error 3371 Status Code –11118. In case you require an instant solution in a short time frame, you can follow the quick manual solution. Follow the below-given manual troubleshooting guide to up-stem the error once and for all.
Method 1: Update your Windows system drivers
Ensure that all the Windows updates are installed.
Later, follow the instructions given on the screen to complete the installation process.
Once it’s successfully done, install the QuickBooks application again.
Method 2: Delete the ‘EntitlementDataStore.ECML’ file
Make sure that QuickBooks is completely closed.
Check that no QB-related program or file is operating in the background.
To see and close the background QB programs, visit the Task Manager.
Now, hit the Windows + R keys on your keyboard.
After that, type ‘C:\ProgramData\Intuit\Entitlement Client\v8‘ in the Run command box.
Go to the QuickBooks directory, search for & open the Entitlement data folder.
Look for the EntitlementDataStore.ecml file and delete this file.
Once the above steps are done, run the QuickBooks program, and register the product again.
Method 3: Setting up Windows updates
One useful approach to fix error message 3371 in QuickBooks Desktop is by updating Windows. This will update the Windows components to their latest version and will also set up the security updates. The steps include:
In the beginning, go for the Start menu
The subsequent step requires typing “Update” and then opening the Windows Update feature.
Next, set the Check For Updates tab.
As the updates get revealed, mark all of them.
Afterwards, tap on the Update Now tab and kickstart the update.
The system shall restart, and if it doesn’t, go for a manual system restart.
The updates will start installing on the system, and once they are done, the desktop will load up.
Launch the tool and let it run and fix any issues.
Note that the process might take some time to complete.
End the process by rebooting the system.
3rd Step: Run 3371 error fix
Double-click the icon on the Windows desktop and open the tool hub.
Choose the Installation Issues tab.
Hit on the 3371 error fix.
Finally hit on the OK tab and start QuickBooks and open the company file.
Method 6: Terminate all running QB-related processes
Herein, you are required to initially close QuickBooks.
Also, close all running QuickBooks processes.
Type in ‘C:\ProgramData\Intuit\Entitlement Client\v8‘ in the Run window and hit the OK tab.
Now, open the Task Manager.
Move the tab named Processes and find all QBW32.exe instances.
Choose each instance individually and hit the end task option.
You now have to remove the entitlementDataStore.ecml file and open the QuickBooks company file and register the application.
Method 7: Uninstall and Reset MSXML
Some corruption in the Windows components can also embolden QuickBooks Error 3371 Status code 11118. To get this thwarted, perform the steps below:
The first move is to head to the Control Panel.
Therein, make a move for the Programs and Features tab.
Upon clicking on this tab, a long list of installed apps will appear. Search for MSXML and .NET Framework programs and get them uninstalled by clicking on the Uninstall/Change tab.
Then, proceed by clicking on the Repair tab to get these components removed.
Although there is another option of repairing the file, it is better to uninstall the components and install the compatible versions of these components from the official website of Microsoft.
The QuickBooks Error 3371 Status code 11118 shows up in different forms
This error can appear in the following forms:
“Could not initialize license properties. [Error 3371]: QuickBooks could not load the license data. This may be caused by missing or damaged files.”
“Could not initialize license properties. [Error 3371, Status Code -11118] QuickBooks could not load the license data. This may be caused by missing or damaged files.”
“Could not initialize license properties. [Error: 3371, Status Code -1] QuickBooks could not load the license data. This may be caused by missing or damaged files.”
Possible causes of QuickBooks error code 3371
Let us now check out the possible reasons that incite the error message 3371 in QuickBooks Desktop. The error may be caused due to any single factor or may be due to the various causes working together to bring about this error:
If one or both crucial components of QuickBooks get corrupted or damaged, in such a situation, it possibly moves from its original location. Usually, those two components are
dat: It is one of the essential files present in the QB folder that contains the account’s license information. To check this file, you need to retrieve it while the QuickBooks version opens.
MSXML Component: The MSXML Component is also a crucial component that ensures smooth operation.
Due to the outdated Windows operating system.
If the system security program detects QuickBooks files as a threat or virus to the system.
For Right Networks and QB Enterprise with WebConnect users: You may experience this error if you open the file before you save it.
Sum up!
Hopefully, this segment would be useful for you to understand and fix QuickBooks error code 3371. However, in any case, if you need immediate QuickBooks help or support for this particular error or any other QB-related issue, you can contact our Intuit-certified professionals via our helpline, i.e., 1-888-368-8874. We comprise a US-based team of qualified professionals who have devoted themselves to the field for several years and have served clients on a global level.


?")
?")
?")
?")
?")
?")
?")
?")
?")
?")
?")
?")
?")
?")
?")
?")


?")
?")
?")
?")
?")
?")
?")
?")
?")
?")
?")


